Paradiso In/On Seam Pocket Insertion Tutorial!
Hello!
I LOVE a good pocket insertion!
So I wrote this little in/on seam pocket construction tutorial!
This is a cleanly inserted pocket, generally done on a side seam of a garment.
I am starting out with 2 pieces of gray linen to mimic the pieces
of a garment like a dress, skirt or even trousers.
Note the sides that are raw edged and not finished are the sides I will be working with!
Here is my Paradiso In Seam Pocket Pattern.
You can download here for free!
Laying out the pocket pattern on white woven cotton
using large pattern weights.
Hint: I suggest using woven fabric for pockets even in knit garments
to give more structure to the pocket!
Each pocket needs two pieces that mirror each other.
For the pocket construction we need 2 pocket pieces and 2 garment pieces.
Hint: It is fun to use contrast or a print fabric for pockets!
I wanted to mention these pattern weights.
These weights are a game-changer for cutting fabric—they keep everything secure and make the process effortless!
You can find them here!
The next step is to finish around the curved edges of the 2 pocket pieces with serging or a zigzag stitch OR even the 3 part Zigzag stitch.
Do not finish the straight edge of the pocket pieces as shown below.
Then pin the right sides of the pockets to the right sides of the garment as shown below.
Now sew the pockets to the garment sides with a 3/8" seam allowance.
This Seam Allowance is
3/8" seam allowance as shown below!
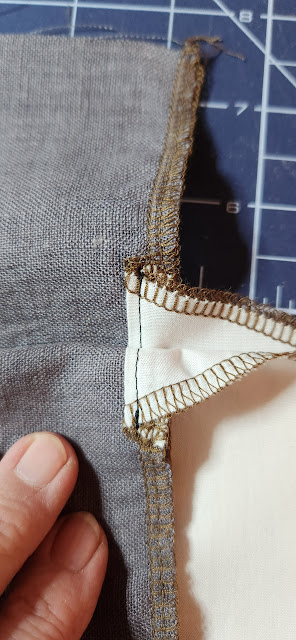
Next, time to finish those straight raw edges by serging or zig zagging.
The edge is being serged below!
Ready to iron the seam first, then fold back the pocket away from the garment.
To secure the pockets in place to the seam, topstitch the pocket
with a 1/8" seam allowance as shown below.
Now to prepare to sew the side seam and pocket together.
As shown below, pin the pockets together close to the top of the pocket, then fold back to see if the pocket seams match up. If it does then continue pinning. Repeat for the bottom of the pocket. Then pin the the rest of the side and pocket.
Pockets is pinned to prep for sewing together.
Sew the sides and the pocket with a 1/2" seam allowance.
Since the pocket was attached with a 3/8" seam allowance, meaning that the pocket will be inset 1/8" and the pocket will not be easily visible.
Sewing the pocket with the 1/2" SA as shown here, shows how the pocket will be tucked into the seam!
Next iron the pocket so that it faces towards the front of the garment,
as seen below.
Then you get the side seam looking like this.
It is hard to see the pocket there.
TIP: On clothing that takes a beating, it can be a good thing to stitch a straight stitch on the right side, exactly where it opens at the bottom of the pocket, sewing from the seam about 3 stitches to secure/tack the pocket in place through all layers. Tack stitches can be seen on work pants like carharts and knit shorts and sweatpants to stabilize the stretch of the knit!
Finished!


Comments