Its a Skirt...OR it a dress, whatever....it is a FREE pattern!!
The Beachy Frocky Skirty Dress!!
With a hi/lo look too!!
With a hi/lo look too!!
Sometimes I can just do what I want,
and I give you permission....
to do what you want!!
Just remember when you choose to be a rebel while doing your own thing...own up to the fact if it works or not.
I will show you how it does work here in my sewing world at the
Paradiso Sewing Lounge!!
I think this FREE PATTERN came out pretty well.....and it is adaptable to many sizes in a easy sort of way!!
So....this is the dress, strapless. It is a great frock or beach cover-up.
One cool feature is that there is a break at each side, the ruffle is finished on the exterior and the interior, and so there is a slit on each side for just a little extra fun to be had!

Yep.....that is Jackx, my lab puppy....who likes to be involved with whatever I am doing...& I let her some of the time!!
I broke a few sewing rules....& let me show you how to do it.
Ain't LIFE grand!!
Here is a close-up of the top of the frock!
Belt from Antropologie.
Necklace by me.

And then it is a skirt too!! And what I really like is that I made the ruffle double faced so that with the hi/lo look, you see finished fabric on the backside of the ruffle!

The Skirty Frocky Dress is 26.5" long in the front, and 30.5" long in the back!
This pattern will work for up to size 18-20 also!Take your measurements, I recommend the skirt/dress body be at least 10-20 inches bigger then your bottom in the voile, and only 10 inches in quilting cotton, which is thicker then the voile used here. Measure your self...be honest, I hate knowing when my booty has yet again grown....urg!
Material requirements:
For up to sizes 10-12
-1 and 5/8 yards of 60" fabric. I used 60" voile. This fabric width makes this pattern work up to plus sizes.
OR 3.5 yards of 44-45" fabric.
-3 yards of 1/4" elastic
-spool of thread
Sizes 14 and up
-3.5 yards of 60" fabric
OR 3.5 yards of 44-45" fabric
-4 yards of 1/4" elastic
-spool of thread
Time to cut!!
Using a rotary cutter, right one edge of the fabric so that it is straight, then cut these strips:
the skirt/dress body @ 26" long
the ruffles 2 @ 15.5" long
(if using 44-45" fabric cut 2 @ 26" skirt/dress bodies, and cut 4 @ 15.5")
**Note if you have the 2 @26" strips for the skirt/dress bodies, they will need to be cut to fit you. Generally, I used the entire 60" of voile fabric for my bust of 36", and my hip at 40". I would sew 2 sides together of your skirt/dress body pieces, then cut off the extra off of each end to end up with a skirt/body piece that is 10-20" larger then your hip measurement. If I were using the 44-45" fabric, I would need a body piece measuring at least 50" wide. After sewing one side together, I would measure from the side seam to 25" on either side of the seam, and cut off the extra. Finish the fabric side edges as described above with the serging or zig-zag stitch. The skirt body is ready to sew the other side seam and create the casing. Keep in mind the quilting cotton is thicker then the voile, and not as easy to gather...so let's keep it easy here.

Here are the ruffles to cut:
2@ 15.5" of 60" fabric
OR
4@ 15.5" of 44-45" fabric
**note if using 44-45" fabric, 2 strips will create the ruffle pieces. The ruffle is twice the size of 1/2 of the skirt body if using voile. If using quilting cotton, then the ruffle is only 50% longer, as it is hard to gather that much fabric. For example, as 44-45" ruffle will be made from 2 strips, it will be around 66". If you are having a problem figuring out what you need to cut, email me with your full hip measurements, what kind of fabric you are using, and the fabric width, and I will help you figure it out!!
I sincerely want you to have success with your sewing!!
I sincerely want you to have success with your sewing!!

Serge or finish the top edge of the dress body strip.
You can finish with a 3-part zig-zag or just a zig-zag, but I do not recommend stitching the zig-zag off the edge of the fabric, because it usually mangles the edge.

Get ready to sew the center back or the side seam if using 2 panels for the skirt/dress body.
Pin as seen below 1.75" down from the top of the seam.
***SEWING HINT...
How to create an elastic casing that is open and does not require an extra step to sew it closed!!
Check it out!!

News Flash...totally breaking a sewing rule, keeping the selvage on....really this will keep the fabric from unraveling if I had a raw edge...of course I can serge it...but for those of you who do not have a serger...well you get it. The most important thing to remember here is to make sure your seam is not sewn in the selvage, that helps....and if the selvage does not lay flat...just clip it ever 2" or so to let the tension go of the tighter woven selvage. I did not have that problem here.
the sa (seam allowance here was 5/8").

Sew the seam starting 1.75" down from the top.
** SEWING HINT
Start sewing your seam about 1/4" down from where you would normally start, then backstitch to where your seam starts. Please always hold your thread ends at the start of any stitching. Then proceed forward to sew the rest of your seam.
This leaves you with a cleaner finish, and the thread ends are "buried" and not showing at the beginning of the seam...this also helps to ensure that your fabric will not get bunched up when starting a seam!!
This is what your seam should look like below! If you look closer...you can see where I started to sew 1/4"...look where the thread tail starts and that is where I started....just saying. It is for no-fault sewing!!

**SEWING HINT...
Iron your seams after they are sewn, and they will be stronger and straighter!!

And now iron the seam open to end up with this result!

Fold down the top edge 1.75" to create a casing for the elastic!

Please notice the way the edges are pinned at the casing opening, to keep your edges straight!
Then sew in the middle of the serging or zig-zag, with a 1/8" sa. The casing opening will be in the back if using one piece of fabric for the body, OR the side if using 2 panels for the body!

This is how it should look!!

Next the rows of stitching are added to make the 3 casings. 1/4" elastic will be used, so there has to be ease with the elastic to act and look right!!
The casings will be 1/8" larger, so 3/8" casings will be sewn.
***SEWING HINT.....
Always measure your casing to be sewn to make sure it is the right size. Below you can see that I have measured, and moved my needle over to get a 3/8" sa when following the edge of the pressure foot with the last row of stitching.

Make sure to meet the stitching and where it started when finishing each row of stitching!!

Continue to sew 2 more rows of the 3/8" sa, to end up with 3 casings total.
***SEWING HINT....
Always finish your casing with topstitching at the edge to prevent the elastic from wearing through the top of the casing, and holding the elastic in place.
This is such an important design element that is often overlooked in so many designs that I have seen over the years...it makes all the difference in how a garment looks!!
I used a 1/8" topstitch here to finish off the casing!
This is a simple way to do a casing...and you can change the elastic if it gets worn out...or it needs to be adjusted!


Ok...time to hi/lo this frock!!
On your cutting board fold the body into half, and lay the front fold as you see it here.

Now lay a measuring tape to the bottom, and you can see that I am angling my ruler just a tad past the center of what would be the side (if using 2 panels for the body, this angle would end just beyond the seam). You will see in the next photo, the angle is started 4" up from the bottom front fold.


If you want a more dramatic angle..kick it up a notch to angle at 5 inches, but proceed with caution. You can always cut it a little, put it up to you to get a feel for how high the front is in relation to the back, see what you think and cut more if needed. Think three times, measure twice, and cut once...or again!!


Smooth out the cuts on the front fold so it is not so angled, do the same at the sides where the angle cut ended too. This leaves a smooth transition from high to low and for adding the ruffle.


Here is the ruffles. If you are using 2 pieces to make each ruffle, join them first, cut off the excess as discussed above, then proceed with the next step!

With the ruffle pieces ready to sew, the first thing is to fold and pin the short edges right sides together.

Then sew (remember to not sew the seam on the selvage), but past it...here I used a 5/8" sa, but in some cases the seam may need to be as much as 3/4" from the top of the ruffle towards the fold to enclose the edge, back stitch at the beginning and end of the seams. Repeat for the other side.

Trim the corner to within 1/8".

Turn ruffles out to the right sides, ease out the corners with a point turner to reveal the entire corner, then iron.

Baste (sewing with a 5.0-6.0 stitch length) with a 1/4-3/8" sa at the top of the ruffles making sure to start about 1/4-1/2" from the edge, this will make it easier for you to pull the threads and gather the fabric.

Now it is time to make clips that are the marking system so that we know how to join the ruffle to the skirt/dress body.
-If the skirt is divided into 4 equal parts then the ruffles are in four equal parts, then they are matched, ruffles gathered, then sewn onto the skirt/dress body.
Start with dress, if you have just the one seam, then that is the center back, fold to find the center front, clip with a 1/4" clip. Put the CF and CB together to find the sides, and make clips there.
-If you are using 2 panels for your skirt body, then the side seams are the sides, putting them together to find the cf and cb, then clipping.

Side clips on skirt/dress body

Clipping the centers of the ruffles...

This is perfect when the basting stitch starts here, so much easier to work with to pin and then to gather!

This is the ruffle center being aligned with the center back bottom of the skirt/dress.
Start pinning all the clips to the right spots. The side seams or clips of the skirt/dress will align with each of the 2 ruffle ends butted up to each other.

Here is the entire bottom pinned with both ruffles gathered to fit the bottom of the skirt/dress.
If you look closely to the left side of the fabric you can see where the ruffle edges are pinned right next to each other. ****SEWING HINT: You will also notice that the top thread of the basting is the one that was pulled to gather, and then anchored around the first pin that is pinned right next to where the basting is started. Always pull gently and straight to not break the thread. With the pull thread around the back of that pin, there is a bit more leverage to gently gather the ruffle, and to keep it straight.
Then I do not have to waste time or thread sewing another basting thread.
If for some reason the thread does break, just re sew the basting stitch. I have only had to re sew that basting stitch 3 or four times in the many years I have been sewing.

Sew the ruffle on with a 5/8" sa, make sure to not sew over any pins, and to pull the gather threads out of the way...do not cut them until the ruffle is sewed on...and please always back stitch.
Serge or zig zag the edge of the sa, then topstitch on the right side with the sa up to anchor it into place with a 1/4" sa, as seen in the photo below.

Now is the final step to insert the elastic. ******SEWING HINT:
1/4" elastic is tricky and acts differently then wider elastic. It stretches quite a bit different. Wide elastic needs to be around 4" shorter then the object it is going to surround. I found that 1/4" could go as much as 10- 12" smaller. I started out with the elastic only 6" smaller then my hip measurement, put it into one casing, sewed it up and tried on the skirt...it was way big. I ended up taking 6 more inches out before the skirt/dress fit me as a skirt or as a dress properly! I love these multiple casings, as they are a super comfortable fit!

Insert each elastic with a safety pin through the elastic to help guide and ease it through the casing. Pin the elastic end so that it will not follow into the casing...you do not want to have to start inserting the elastic again!!


I over lapped the elastic edges by 1/2-3/4", and used a zig zag and stitch the edges together, make sure to stitch the entire overlap.
Then gently ease it back into the casing, and gently pull the casings to ease the elastic evenly.

*****SEWING HINT:
If you cannot get that darn safety pin to the casing opening because it keeps getting stuck in the seam allowance, insert something like the tip of a scissor to hold the seam allowance closed and allow the safety pin to make it to the casing opening!!


And this is what the casing should look like after all elastic is inserted back into the casing!!

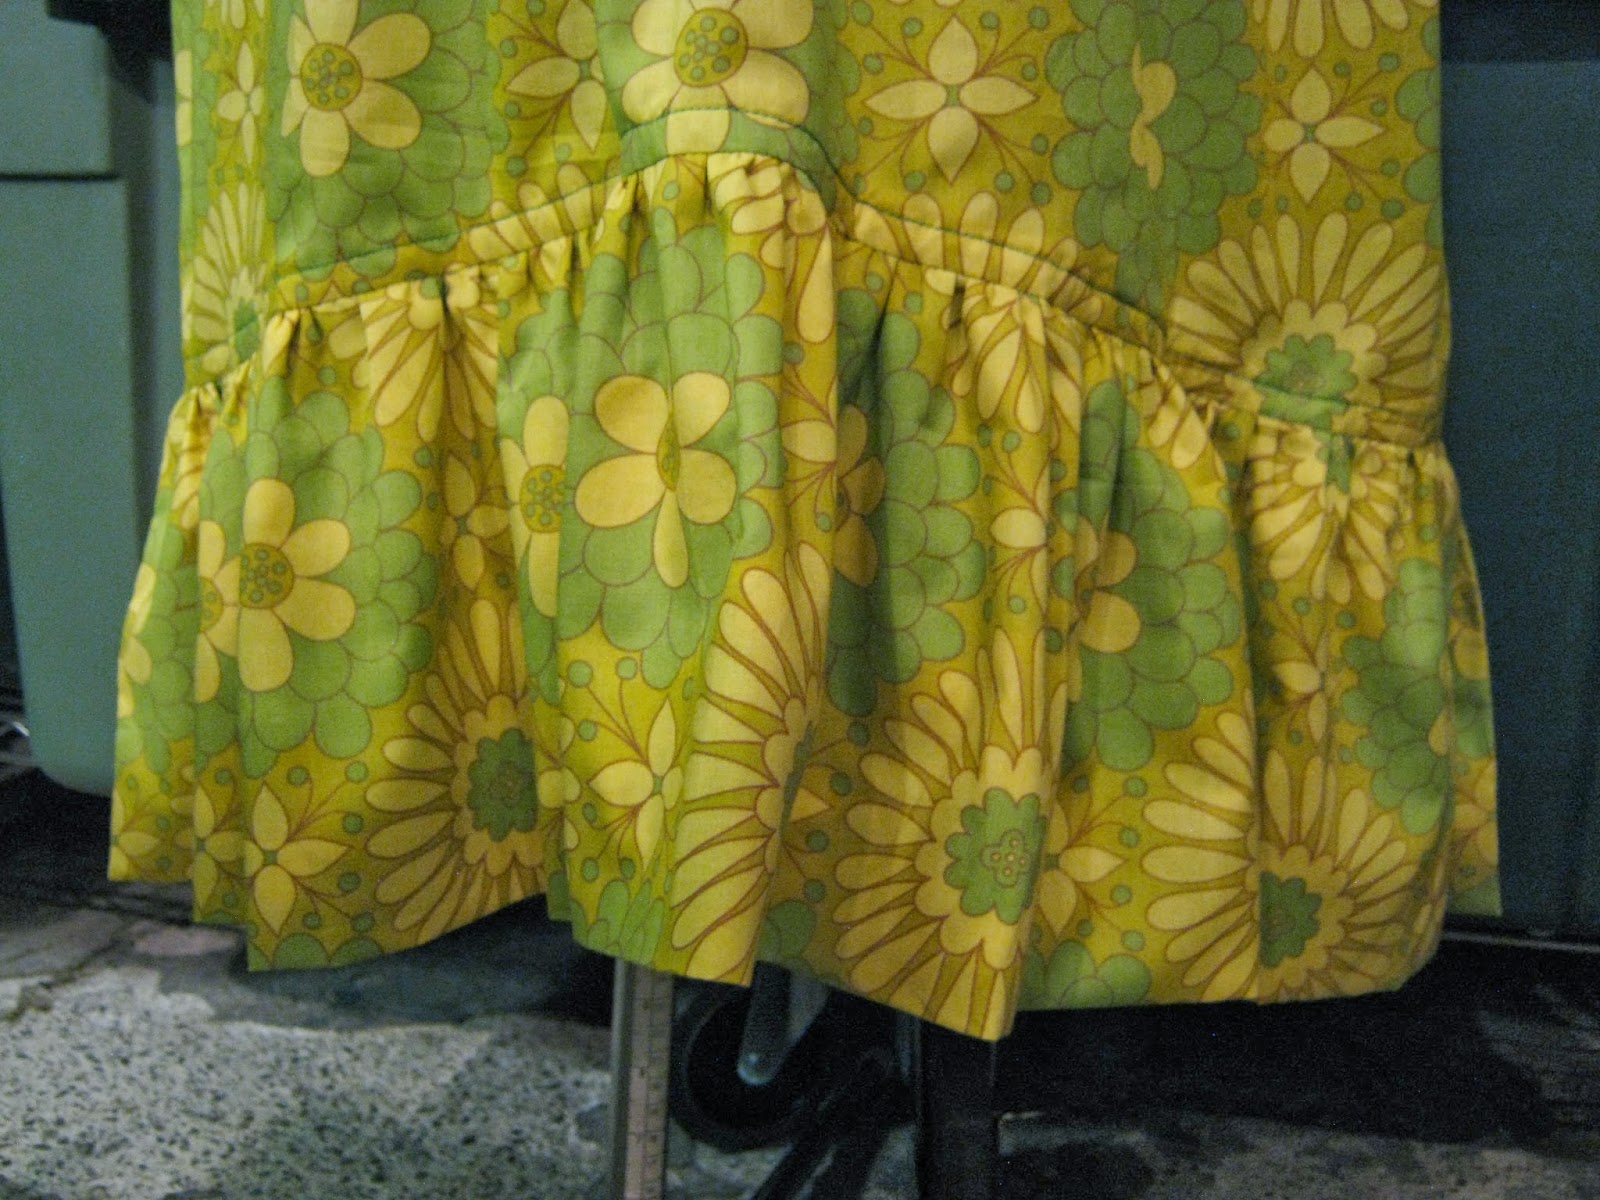
This is what the hi/lo bottom of the Skirty Frocky Dress should look like!
t

Final look at the finished skirt.....that is also my Tiny Bag in the picture...necklace by me!

and a final look at the strapless Frock...it can be a beach cover up and fashion staple for your wardrobe!!
Love to hear what you think!!
xoxoxo,
Cheryl


Comments