How about a little hand puppets in your life!! FREE TUTORIAL!!
Sooooo,
I was very lucky and had the opportunity to meet & work with the lovely folks at Blend Fabrics!!
And the best part is I get to work with fabric designed by Cori Dantini!!
If you have seen Cori's fabric, I do not know anyone that has not fallen in love with it. Through her designs Cori has been able to convey a beautiful sense of purpose with her artwork about what life should be like. It makes me stop and think about if I am doing everything I do @ 100%....all the time.
Needless to say....she is one of my favorite artists!!
And go to here to see her artwork for sale too!
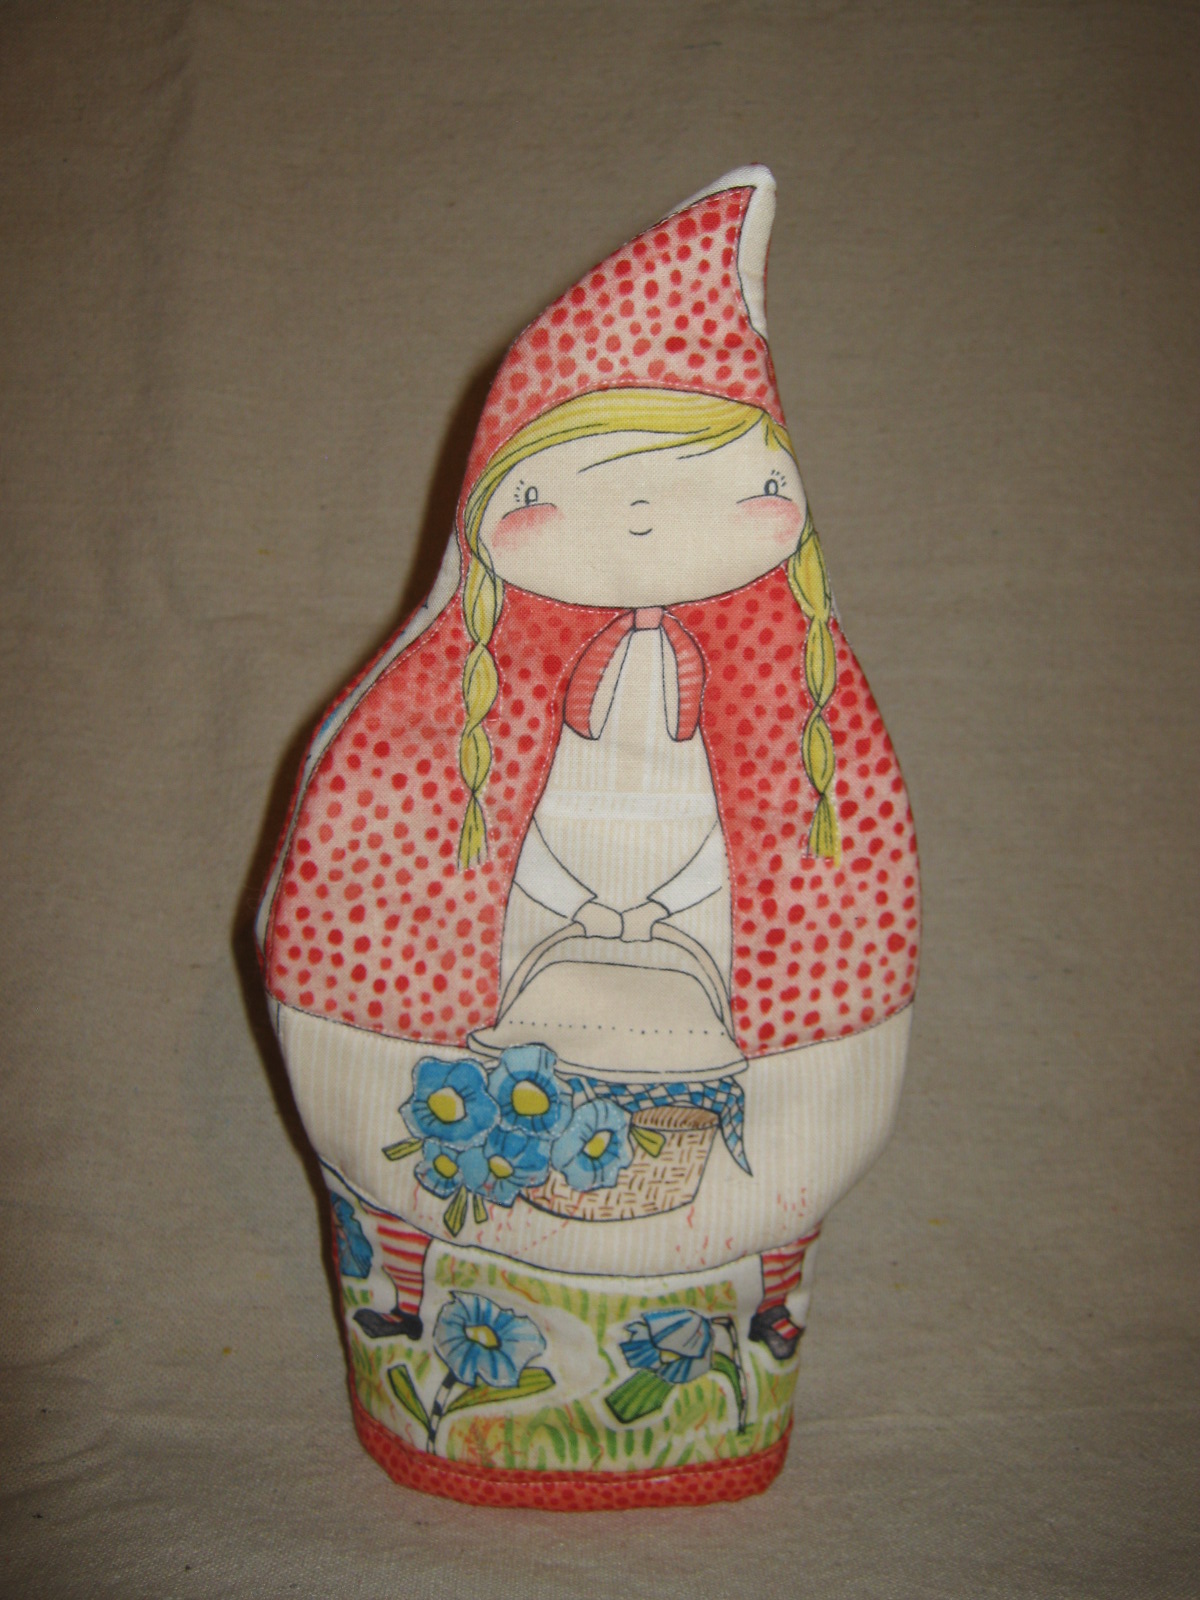
It was not hard to play with this fabric "Little Red", which is due to hit fabric store shelves in January 2016!
Here is the "Red" puppet, isn't she sweet!!
I also made puppets out of the rest of the characters too!!
Here is Little Red with the rest of the gang,
which includes The Wolf, The Woodsman, Grandma, and the Wolf acting like
Grandma. The puppets are actually
standing here on the trim that finishes the bottom, but are open so that these
really are hand puppets!

So.....here is what you need to jump into making!
To get started, here is a list of materials that you will
need. Materials needed:
-One Blend fabric panel of Little Red Characters
-Matching fabrics to complement the character, 1/3 Yard per
Character
-Muslin. 1/3 Yard for 1-3 characters
-Bosal #326 Sew-in Fleece, 1/3 yard for 1-3 characters
-White Thread
Step
one:
The characters come on a fabric panel; the other fabric will be used for
the back of the puppet and the bottom finishing trim
Step
Two:
Trace around Little Red (Or any character with a ½” border for the seam allowance & cut
out. As seen here then Little Red is
laid out on 2 layers of muslin & 2 layers of fleece, and cut out!

Step
Three:
Now Layout just Red, and notice she is laying on the wrong side
of the fabric that will become the puppet back.
Pin this and cut out.

Step Four:
Measure
the bottom of Red, multiply by 2, and then add 2 inches to determine the length
to cut the bottom trim. Cut the trim out
of the backing fabric at the length determined above as a 2” wide strip. And here is how it will be ironed….
The
2” wide trim will first be ironed in half, then on only one side, the raw edge
will be tucked into the center fold, and ironed along the whole length,

then
turned around and the other side will then be ironed in also. One side at a time is ironed to maintain that
center fold! If you have ever sewed with
any of my Paradiso
Patterns I used this trim for all sorts of finishes, and it is truly easy to
make & sew on!!


Step
5:
Here are the 3 layers that we need for each side of the
puppet. There is the exterior fabric,
the fleece in the middle, and the muslin to sandwich the fleece just like in a
quilt. Pin around the edge to hold the
pieces in place so that they will not shift.


Step
6:
In the first picture, here is the muslin side of Red, and the
quilting outline of Red is visible. As
you can see in the second picture I free motioned stitched around Red to make
her cuteness stand out. One the back I
stitched a big flower that mimics the blue flowers she has in her basket.

Step 7:
Sew the front and the
back together!! Pin the front & back
together, and sew the sides and top with a 1/4” seam allowance, or even sew
with the edge of the pressure foot, and move the needle all the way over for a
“fat” 1/8” seam allowance.

This is the Woodsman puppet below.
I sewed with the right edge of the pressure foot on the edge of the
fabric, and I moved the needle over to have a fat 1/8” seam allowance, which
means that there is not a lot of trimming to do. Stitch on the sides and the top, leaving the
bottom open. Make sure to trim at the
points, & clip up to any corners so that the puppet will turn nicely.

Step 8:
Add the trim to finish!
Find the middle of the trim, and the middles of the front &
back of the puppet, and I generally use pins to mark these points. Match the center fronts of the trim to the
puppet and envelope the bottom raw edge with the trim. I pin the trim on as seen in the picture so
that I will not poke myself with the pins.
Pin to just the side seams.

As
seen in this picture on the back side I use that center back pin (the pin above),
and then mark the center back of the trim on either end of the trim.

Then I measure 3/8” from that point to allow for a seam
allowance, and cut off the extra.

After
trimming the excess length, the trim edges are pinned & sewn with a 3/8” seam allowance.

Then
the corners are trimmed to eliminate bulk as seen in the picture below! Fingerfold the seam open, then finish pinning
the trim to enclose the bottom edge into place.

This
is where you need to take your time to sew the trim on with a 1/8” seam
allowance.
***Tip: Start in the back, and make sure the front edge is not
folded under where it could get caught underneath, sew about an inch at a time,
then check & adjust the edge not seen so that it is out and away from this
finish stitching!

Here is the whole bunch!!
Wolfie, Grandma, Little Red, The Woodsman & The Wolfie as
Grandma!

Have fun with your puppets too!
THE END!!!!
If you liked the puppets, next will be another free tutorial to take this one step further to make pillows!! See ya in a few days!!
Merry Christmas
Happy Holidays
With Many Holiday Sewing Hugs,
Cheryl


Comments