Free Patchwork Pattern: Zareena's Heart
On Valentine's Day this year I had to take a break from my work.
I needed to just make something that was not my creative/teaching work.
Something beautiful, but simple, and possible to create in one night.
I just needed the pure joy of making, and not for profit.
Say HELLO to Zareena's Heart!

I decided to make a foundation piece in the shape of a heart.
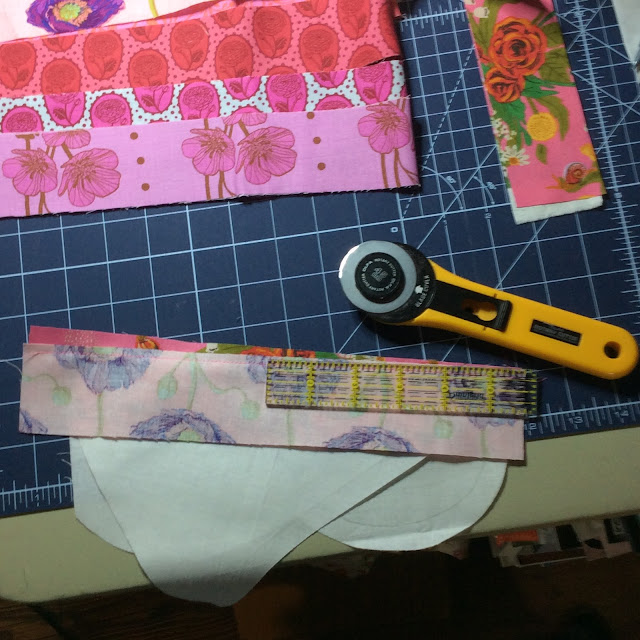
I gathered 9 fabrics that could harmonize together, based on the colors of red, pink, & purple.
I have an Instagram friend @thecornyrainbow (Nefertiti) who each year for the month of February wears these colors to promote heart health & awareness as a tribute to her sister that transitioned in 2014 at a young age of pulmonary artery hypertension. I highly recommend following Nef on the Gram for alot of sewing goodness from a true goddess!
So I came up with this simple design using those colors in 9 different fabric in shades that I love to make this heart that can be used to embellish a hoody or a bag or for whatever you would like. This project is a tribute to and named after Nef's sister, and is called "Zareena's Heart.
Materials to make Zareena's Heart:
Muslin piece 10" x 13"
9 cotton fabrics in 2"x 12" strips
I made a Zareena's Heart PDF pattern that is a free download here on my website paradisodesigns.com
Here is how the pattern prints out.
It will be in two pieces.

The edge shown below on piece B needs to be cleanly trimmed off.
TIP: Notice this rotary cutter is marked and used for paper only!


Next preform a little tape surgery to hold the pieces A + B together in
preparation for the next step. Lay B on top of A.
I used a small piece of tape, and placed on each side, careful placement not outside the lines.
I marked the tape with purple pen marks so you might be able to see

Now let's sew the pieces together with a 1/8th seam allowance,
I promise this is the easiest want to put a PDF pattern together.
It is so much easier to get the pieces straight.
I wrote and entire blog post with tips for sewing patterns together here here

And do not sew outside the lines of the pattern, so the stitching is not cut.
Remember to back stitch too.

Now the pattern is complete, time to cut it out!
TIP: I will use my 1"x6" ruler to help cut out the curves with a rotary OR use paper sissors!

Here is the sewn heart!
This is my dedicated rotary paper cutter!

Turn the pattern face down and trace around onto a piece of muslin.
Do not worry about the marks, they will be hidden from the fabric sewn on top!

The drawn heart on the left is the back of the heart.
The pattern as shown is right side up....but you can switch it up.
The drawing does need to be in the back so it can be seen while the heart is being formed!
Cut the heart out with a 1/2" border.

You will need 9 fabrics, each a 2" strip that are at least 10" long.
I arranged mine from light to dark....
but the world is your oyster and you can do what feels awesome to you!
Also, you can see how I made ray's with the fabrics so it looks like sunshine rays,
and creates movement in your piece!

I have placed the middle fabric from the fabric lineup here
in the middle of the heart at a little bit of an angle.
I just pinned this in place because the next fabric on each side when sewn will secure it.
This is also a good time to audition each fabric to make that fan with the angles to see how much of an angle you need to cover the heart and achieve the angle you like!

This is the next color, right side down. Make sure
that the when flipped right side up will be right side up!
Sew with a 1/4" seam allowance following along the upper edge
of the top fabric that has the wrong side up.

Now I have folded down the muslin heart foundation back
to trim the seams even for a nice foundation.
After all the strips are sewn on, the heart shape will be cut out!
Now flip and iron the fabric up.

And this is the second fabric laid at an angle, and repeat, sewing the seam, trimming & iron.

This is the last piece that needs to only span one side of the heart top.
Here the seam has been sewn.

Muslin is flipped back up!

And ironed!!

Here is the start of filling out the bottom of the heart!

After the heart is cut out it can embellish a t-shirt like here!

I have a great tiny zigzag stitch on my machine that will hold Zareena's heart in place!!
And my hope is for the edges to fray when the t-shirt is washed!!

And here is the finished heart...I hope you enjoy it.
Please share with all your friends!


Comments