The Anyone Crossbody/Sling Sew A Long, Day 1: The Pleather Strap & Bag Tabs!
Welcome!!
This step by step
sew-a-long to construct the
Anyone Crossbody-Sling Bag!
This is 1st picture is my fav Anyone Sling Crossbody Bag.
The Copper Croc pleather is from my Paradiso Pleather Collection .
I hand-painted the fabric + waterproofed it too!
I made this bag for myself...but first I always use it for a class example!
Please read these instructions & the pattern booklet carefully.
And cut your pieces out very accurately
Here are some examples of the Anyone Crossbody/Sling Bag
I sure had fun making this Anyone bag.
I actually Ice Dyed the fabric + waterproofed it too.
I like bags that function in wet weather.
My pleather/vinyl here can weather a serious downpour.
And I can make fabric water resistant by coating it with Odicoat.
To learn more about Odicoat, click here!
This is one of my Paradiso Ice Dye Colorways, Coral Deserts
with Etched Coco Pleather for strap & bag top.
This Anyone is my Ice Dye Kit colorway Blooming Nights. &
Silver Pleather for the strap & bag top.
The dye interacts with this simply woven canvas to create this dye pattern.
with contrast stitching with Wonderfil Designer 40 wt. Polyester Thread
Wonderfil Designer 40 wt, but lays down wide to look like a bigger thread then it is!
Here is my dear friend Alex with her Anyone Sling on!!
Let's figure out what kind of tab (where the strap connects to the bag) is desired.
There are 3 kinds of tabs to make: a grommet tab out of pleather, a grommet tab out of fabric,
and a ring tab out of pleather.
The Pleather Grommet Tab
I had fun this this contrast thread from Sulky.
It is a 100% Polyester Called Poly Dec. in Neon Red.
The Waterproofed Fabric Grommet
Last, the Pleather Ring Tab
FYI...here is the Anyone Hardware Kit
It includes everything to make the tab of your dreams that will rock your boat!
the zip + swivelhook/ring set + buckle + grommets
Comes in silver OR gold.!
The pleather/vinyl Strap & tabs are sewn first.
It will require a Non-stick OR Teflon OR Walking Foot
Plus a bigger machine needle.
A 90 needles were used here, but a 100-110 needle may be required
for thicker pleather/vinyl.
TIP: Replace your sewing needles should be replaced every 8 hours.
And you can see how I store old needles, then
eventually throw them away!
Below is the 1" strap. Click here for the blog post to sew a 1" strap
Click here for the blog post to sew a skinny strap/tab.
Below is the skinny strap for the ring tab.
Click here for more Gospel of Pleather sewing posts!
Here is the skinny strap/tab.
In the pattern 3" tabs are cut. They are a little easier to sew on.
But here I are cut the tabs at 2.5" for a tighter look.
Same Sulky Neon Red Poly Dec thread is used here too.
Cut 5" piece
Then cut into two 2.5" tabs.
Here is all the hardware that will be used in this Anyone!
1" Buckle
2 Small Swivel hooks
2 Rings, 1 for each tab.
These are the ring tabs and will be sewn on later in the construction process.
Pleather Grommet Tab
Cut 3" off of strap, then cut it into two 1.5" pieces.
Each tab needs to have a finished edge where it has been secured with a double row of stitching.
As shown below, put the end to finish flush with the right side of the foot.
The needle needs to be all the way to the right.
Using a 2.5 stitch length & holding the thread ends, start in the middle of the tab and
sew forward and over the tab edge,
then repeat to back stitch over the back edge and back to the center.
This is equal to a double row of stitching.
Cut threads with a scissors, do not use an automatic cutter on pleather.
It will not play nice with the automatic cutter.
Use a hole punch to cut a hole where the grommet will be inset.
Then use a sharp pair of scissors (like Kai) to cut 1/4" long clips in
4 spots of equal distance from each other then between those.
Check out the next image to see the grommet eased through the hole after clipping.
Make sure the strap seam is on the back of this tab.
The clipping makes it possible to fit the grommet piece.
This was not easy to easy this part through.
BUT a tight fit is important for the grommet to have material to hold onto.
Making for a strong grommet that stays in place.
I found this Dritz Video to show how to use a grommet pliers here.
The pliers come with a circle cutter, which may be a little easier to work,
but the pleather tab is pretty thick.
There are also hand tools that come with grommet kits, but I recommend using
the pliers. I bought a pair years ago and it has served me well!
Next, how to make a waterproofed fabric tab.
This fabric has already been coated with Odicoat, and has a leather feel to it!
Size is 4" x 6".
As shown, this will be the starting fold.
Because of the coating, the fabric will need a folding tool to help crease the
fabric, as an iron cannot be used on the treated fabric.
Each end will be folded into the middle, to create 2 tabs.
Then we fold in the middle here, this piece measures 3" x 4".
Then maintain the 3" length, folding each side into the center,
folding the 4" width down to 1".
Below shows folding into the center from both sides,
Then finally enclosing both ends, this piece should measure 1" x 3".
Clipping as shown to stay in place for sewing.
Sew with a 1/8" seam allowance starting at the center, Sew around
the entire piece, ending back in the center.
Sew again for strength
Please keep in mind this will be thicker to sew through,
So use a 3.5-4.0 stitch length with a 100-110 needle.
It will be easier to sew!
Cut in half at the center, so the tabs are 1." x 1.5".
Here are the tabs cut to 1" x 1.5".
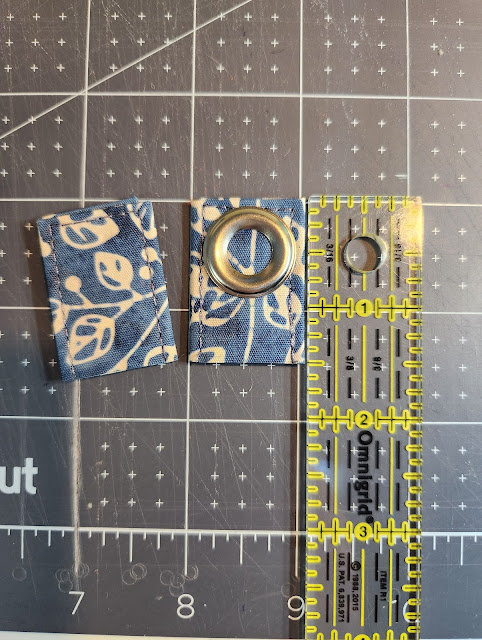
Grommet is used to center where punch hole will be inserted.
Now time to hole punch the tabs.
The back edge of the tab will be caught in the side seam allowance of the bag.
Use a grommet to get the hole placement right.
Next clip (1/4" long) at 4 equal quarter sides in the hole, then clip in between the initial clips, for 8 total clips.
This will give ease to get the get grommet through.
Again looking for a tight fit. Nothing needs to be trimmed.
***Pay attention to the side ( the nicer side) of the tab you want in front.
The grommet has to enter from that side.
This Grommet "disk" fits over the grommet prong as shown.
After using the grommet plier to apply the grommet permanently,
this is what the back will look like!
Next is to tackle the strap.
There is one long strap piece sewn.
Start by cutting a 13" piece off the long sewn strap.
The hole punch will be used to make the notch holes for the buckle prong and
for the buckle to attach the strap end. Doing a series of notch holes allows for strap adjustment!
Please note that I am making the notch holes on the edge of the cutting board.
The hole punch does make circle marks and I want to make these marks where I am not
going to cut with a rotary cutter.
A single notch hole will be made 2.5" from one end of this 13" strap piece.
Use the clear ruler to find the strap center and where to make the hole.
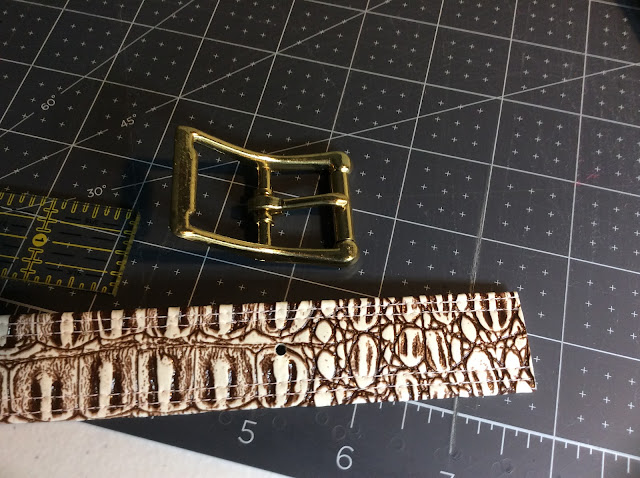
Line up your buckle as shown with you strap piece. please note the hole.
The buckle will be "threaded" onto the strap, and the buckle prong will fit through the hole,
as shown on the net slide.
Push the prong through the hole.
As seen here, the strap will be folded back,
clipped into place and secured with sewing.
The strap is inverted so the end can be easily seen, plus the buckle is out of stitching way.
Clip the fold into place as shown allowing for sewing without hitting a clip.
The edge of the machine foot is flush with the folded end as seen here.
Move needle all the way over to the right.
Notice the foot is on top of the strap in the positioned in the middle.
It is an advantage to starting in this position versus sewing up to climb up and onto the strap.
The stitching consists of sewing forward & just over both edges,
then in reverse and over the back edge, ending in the middle.
Effectively sewing 2 rows of stitching.
To finish turn the stitch length down to .90 and sew a couple of stitches.
The is the equivalent of back stitching...but better.
For a professional look, move the needle to the center and repeat another row of stitching.
The double row of stitching is golden. BUT, if the opportunity arises to check out
a designer handbag, do it and take note of those types of finishes.
Clip all the threads, and the ones in between the rows of stitching too.
Next thread the other end of the strap onto one of the swivel hooks.
Please notice how the strap is bent. The top of the bend should be the
"wrong side" with the strap seam. Thread through 2",
then fold down to the "wrong side" and clip into place.
Secure with a double row of stitching as done before with the buckle.
I use the ruler on my machine all the time for "on-the-spot" measuring!
Repeat the sewing process used for the buckle!
Here is what it looks after finishing the 2nd row of stitching.
Here is the finished buckle part of the strap.
Now for the other side......
On the long strap piece, finish one end of sewing a double row of stitching
as shown before!
2 inches for the edge is where the first notch hole goes,
then put in 11 total holes, spaced an inch apart.
Notice how the ruler is over the strap and perfectly centered.
This will allow for expert hole insertion!!
And I use the board to measure the holes too!
Here is a close up of the ruler and how it shows the true center!
And here are all the notch holes
This is the end of Day Two of the
Anyone Crossbody-Sling Bag Sew Along
Tomorrow will cover
Anyone Sew A Long, Day 2 Exterior and Lining Construction!


.JPG)


.JPG)


Comments